
先日の記事からの延長でご紹介です。


WP EditorにはAddQuicktag等が反映されない
AddQuicktag等は標準のエディタ用に作られているので、WP Editorを使用した場合には残念ながら変更が反映されません。
そのため、今日はWordPressのプラグイン、WP Editorにはカスタムボタンを追加する方法がないので、今日はそのTipsのご紹介。
WP Editorにカスタムボタンを追加する方法

インストール済みプラグインのページから、WP Editorの編集ボタンを押します。

jsフォルダの中にある"posts-jquery.js"ファイルを開きます。
実際にコードを追加する必要があるのは2箇所です。
私の場合、h2,h3,h4のタグが欲しかったので、それを例に紹介します。
追加するコード1カ所目
    $('#wpe_qt_content_link').live("click", function() {
      if(!tags.link || tags.link.lastTag == 0) {
        openLinkDialog();
      }
      else {
        insertOpenCloseTag('link', 'link', '', '</a>');
        tags.link = {'lastTag': 0};
      }
    })
    $('#wpe_qt_content_h2').live("click", function() {
      insertOpenCloseTag('h2', 'h2', 'nn<h2>', '</h2>nn');
    })
    $('#wpe_qt_content_h3').live("click", function() {
      insertOpenCloseTag('h3', 'h3', 'nn<h3>', '</h3>nn');
    })
    $('#wpe_qt_content_h4').live("click", function() {
      insertOpenCloseTag('h4', 'h4', 'nn<h4>', '</h4>nn');
    })
    $('#wpe_qt_content_block').live("click", function() {
      insertOpenCloseTag('block', 'b-quote', 'nn<blockquote>', '</blockquote>nn');
    })
111行目あたりからのコードに上記の黄色行を追記しました。
insertOpenCloseTag(tag, title, beginningTag, endTag)というのがタグの定義で、
    $('#wpe_qt_content_(追加するタグ)').live("click", function() {
      insertOpenCloseTag('タグ名', 'タグ名', '挿入される開始タグ', '挿入される終了タグ');
    })
このような形式でコードを記述します。必要に応じて、コードを変更してください。
endTagに引数を設定しなければ、終了タグがないボタンになります。
追加するコード2カ所目
if(!$('.CodeMirror .quicktags-toolbar').length) {
$('.CodeMirror').prepend('<div id="wp-editor-quicktags" class="quicktags-toolbar">' +
'<input type="button" id="wpe_qt_content_strong" class="wpe_ed_button" title="" value="b">' +
'<input type="button" id="wpe_qt_content_em" class="wpe_ed_button" title="" value="i">' +
'<input type="button" id="wpe_qt_content_link" class="wpe_ed_button" title="" value="link">' +
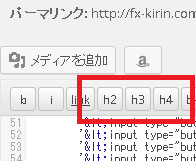
'<input type="button" id="wpe_qt_content_h2" class="ed_button" title="" value="h2">' +
'<input type="button" id="wpe_qt_content_h3" class="ed_button" title="" value="h3">' +
'<input type="button" id="wpe_qt_content_h4" class="ed_button" title="" value="h4">' +
'<input type="button" id="wpe_qt_content_block" class="ed_button" title="" value="b-quote">' +
'<input type="button" id="wpe_qt_content_del" class="ed_button" title="" value="del">' +
'<input type="button" id="wpe_qt_content_ins" class="ed_button" title="" value="ins">' +
'<input type="button" id="wpe_qt_content_img" class="ed_button" title="" value="img">' +
'<input type="button" id="wpe_qt_content_ul" class="ed_button" title="" value="ul">' +
'<input type="button" id="wpe_qt_content_ol" class="ed_button" title="" value="ol">' +
'<input type="button" id="wpe_qt_content_li" class="ed_button" title="" value="li">' +
'<input type="button" id="wpe_qt_content_code" class="ed_button" title="" value="code">' +
'<input type="button" id="wpe_qt_content_more" class="ed_button" title="" value="more">' +
'<input type="button" id="wpe_qt_content_page" class="ed_button" title="" value="page">' +
'<input type="button" id="wpe_qt_content_lookup" class="ed_button" title="" value="lookup">' +
'<input type="button" id="wpe_qt_content_fullscreen" class="ed_button" title="" value="fullscreen">' +
'<div id="wp-fullscreen-save">' +
'<input type="button" id="wpe_qt_content_save" class="button-primary" title="" value="' + WPEPosts.save + '" style="float:right;display:none;font-family: 'Open Sans', sans-serif;"><span class="spinner"></span></div>' +
'</div>'
).height($('.CodeMirror').height() + 33);
$('.CodeMirror-scroll').height($('.CodeMirror-wrap').height() - $('#wp-editor-quicktags').height() - 3);
editor.focus();
}
350行目あたりにあるコードに上記の黄色行を追加しました。上記の例では、エディタ上のlinkボタンの後にh2,h3,h4コードが追加されるようになります。先ほど加えた"wpe_qtcontent*"のコードが一致していないとちゃんと動きませんのでご注意ください。
'<input type="button" id="wpe_qt_content_タグ名" class="ed_button" title="" value="タグ名">' +
形式としてはこのような形です。
この2箇所へのソースコードの変更し保存すれば、カスタムボタンの追加ができます。やっぱりWP Editorで編集していきたいですもんね。
お疲れ様でした!


コメント
[…] ress管理画面 > プラグイン > WP Editor > 編集」でPlugin Filesのうち、「js/posts-jquery.js」ファイルをいじる。 参考:神プラグインWP Editorにカスタムボタンを追加するには _ Wizard In The Market […]